CutLogic 2D provides reports for printing and exporting cutting instructions, labels, lists, and other data. You can use the supplied reports or customize copies to suit your needs.
To open the Reports window, select File > Reports, click the Reports button on the main toolbar, or press Ctrl+P. The available reports depend on the active program section: Plans, Materials, Assemblies, Storages, or Edgebands.
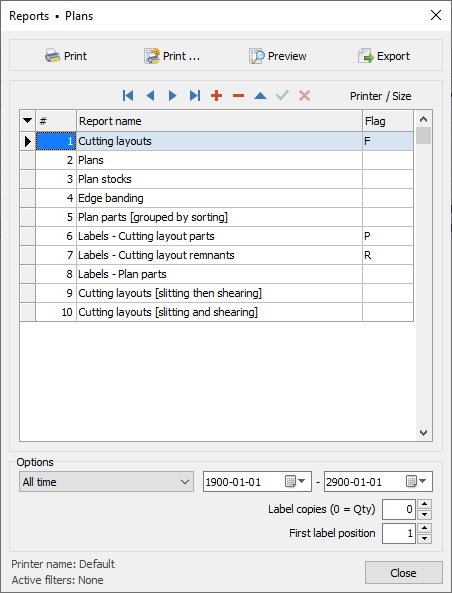
Report fields
The Reports window lists available reports in a data grid. Its fields are:
Field |
Description |
# |
Automatically assigned number, used for default sorting. |
Report name |
Name shown in the report list. Use a name that describes the report's purpose. |
Flag |
P prints the report when you double-click a part in the Results tab. R prints the report when you double-click a remnant in the Results tab. F skips the Report settings window for the Cutting layouts report. |
The navigator lets you browse reports, create copies, and edit or delete custom reports.
Selecting the data
Before opening Reports, select the program section containing the data you want to print. You can use filters and multiselection to limit the records included in a report. For example, select several plans in the Plans grid to prepare cutting instructions for those plans together.
Some reports support Date options that restrict data by creation or manufacture date. Select the appropriate date option and range, or All time to include all dates. These options affect only reports designed to use them.
Two options apply to label reports only:
•Label copies (0 = Qty) - Set 0 to print the quantity of labels specified by the data's Qty field, or enter 1-500 to print that number of copies of each label.
•First label position - Set the first position to use on a label sheet (1-200). This is useful when some labels have already been used. Positions are counted from top to bottom, then left to right. Use 1 for a new sheet.
The bottom of the Reports window shows the selected printer and the active filter.
Select a report and click Printer / Size to choose its printer and paper size. Paper size affects not only printing, but also previewing and exporting.
For standard reports, A4 or Letter paper size is usually suitable. For the Cutting layouts report, you can use sizes from A5 to A0. Larger sizes allow much larger layout pictures in PDF or HTML exports, even when the output is not intended for printing.
Different reports can use different printers, such as an office printer for cutting instructions and a dedicated printer for labels. When workstations share a database, printer assignments can differ by computer and, in network database mode, by user.
For label reports, the selected paper size must match the label format and the printer's paper settings.
Previewing a report
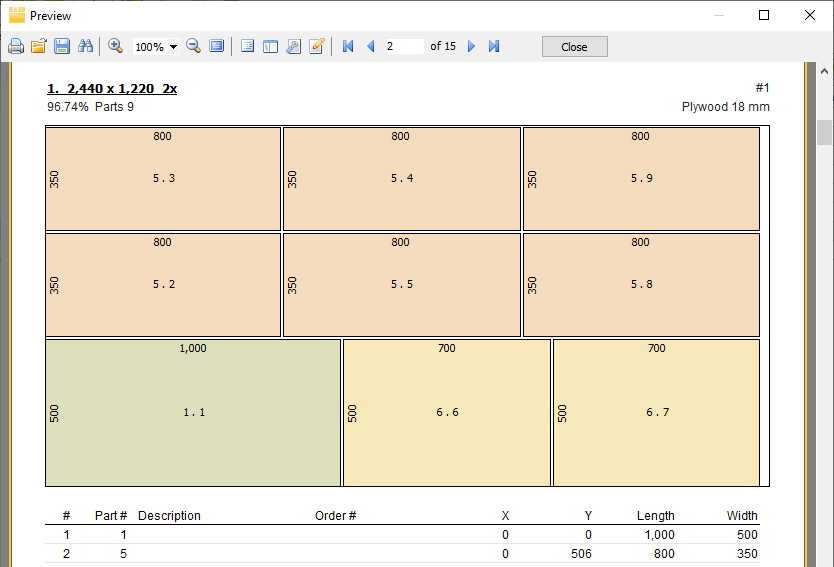
Select a report and click Preview or press Enter. The preview displays the report as it will appear on the selected page size. You can browse pages and change the zoom using the preview toolbar.
Printing a report
Select a report and choose one of the printing buttons:
•Print - Sends the report directly to the selected printer.
•Print ... - Opens the print dialog, where you can adjust print options.
Exporting a report
Select a report and click Export, then choose the output format and destination. Available formats include PDF, Excel, Word, CSV, HTML, and image formats such as JPG or PNG.
PDF is useful for sharing reports while preserving their page layout. HTML (which exports layout pictures as image files) can also be useful when you want to view or share cutting layouts without printing them.
The supplied system reports cannot be edited or deleted. To change a system report, first create a copy. Custom reports can be renamed, edited, and deleted.
1.Select the report you want to use as a starting point.
2.Click Insert (+) on the navigator or press Ins.
3.Choose Copy selected report.
4.A copy is created with an automatic name (for example, Cutting layouts .01) and selected in the report list. Rename it as needed.
5.Click Edit on the navigator to open the copy in the report editor.
6.Make the required changes, then save and close the editor.
The built-in FastReport editor lets you change report elements such as text, data fields, fonts, positions, and barcodes. For detailed instructions, see the FastReport user's manual, available from the TMachines website.