Here you can manage (print, export, preview, create, copy, edit, delete) all available reports and also set printer for each report. Program displays reports relevant to currently active section (Plans, Materials, Assemblies or Storages).
To work with Reports, click the button ![]() on the main toolbar or select the menu item "File > Reports" or press Ctrl+P.
on the main toolbar or select the menu item "File > Reports" or press Ctrl+P.

Main bar
The main bar is a collection of four speed buttons providing quick access to commonly used commands.
|
Prints selected report. |
|
Shows print dialog (where you can select printer, set number of copies, print mode, etc.), and then prints selected report. |
|
Shows preview of selected report. |
|
Exports selected report (data) to PDF file, Excel file, Word file, RTF file, ODT file, ODS file, CSV file, HTML file or sends report as an email. Read more about export in chapter Export. |
Data navigator
![]()
Data navigator serves for navigation and editing of reports displayed in data grid.
Function of the buttons of navigator is following.
|
Moves to the first report. |
|
Moves to the previous report. |
|
Moves to the next report. |
|
Moves to the last report. |
|
Creates a new empty report / a copy of selected report. See more in Report creating. |
|
Deletes the current report (system reports cannot be deleted). |
|
Opens embedded report editor enabling you to modify current report (system reports cannot be modified, however copies of system reports can be fully modified). See more in Report editing. |
|
Posts changes made in the header of the current report (fields No., #, Report name, Flag) to the database. |
|
Cancels changes made in the header of the current report (fields No., #, Report name, Flag). |
Data grid
Serves for setting and managing of reports.

Columns |
|
No. |
Record number. |
# |
User defined identification number. Click on column header # to sort reports by numbers. |
Report name |
Short description of report. |
Flag |
Printing flag which can be assigned to each report. "P - Print after double click on part" - When you double click on part in the cutting layout image (Results tab), report with assigned P flag is immediately sent to printer. "R - Print after double click on remnant" - When you double click on remnant in the cutting layout image (Results tab), report with assigned R flag is immediately sent to printer. |
To rearrange columns, their order and visibility, click the button |
|
|
Tip: Double-click the chosen report or press Enter to preview it immediately. |
Printer setting for selected report
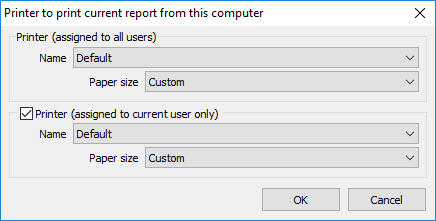
By clicking the button ![]() , it is possible to set printer and appropriate paper size to selected report. This setting is tied to "Computer name", "Report name" and/or "User name". It means that every CutLogic workstation on the network enables (if it is necessary) to print current report on different printer, without changing printing options (avoiding frequent changing of printer).
, it is possible to set printer and appropriate paper size to selected report. This setting is tied to "Computer name", "Report name" and/or "User name". It means that every CutLogic workstation on the network enables (if it is necessary) to print current report on different printer, without changing printing options (avoiding frequent changing of printer).

|
Tip: Setting printer to each computer and user individually can be very useful feature when multiple CutLogic workstations share CutLogic database over network, especially on thin client architecture networks such as Citrix and Terminal Services. |
|
Important: Assigning printer to each user individually is possible only when CutLogic is switched to network database mode. |
Options

Date
Some reports can be filtered by creation or manufacture date. You can set range of date (Date From - Date To) you want to print.
|
Tip: If you want to build your own reports using SQL (Structured Query Language), you can apply date parameters as "DateFr" (Date From) and "DateTo" (Date To) in your scripts. |
Label copies (0 for data value)
Here you can set number of copies of printed labels. By default (if set to 0), program prints for each label as many copies as defined in quantity field (Qty) of printed dataset. If you set custom copies number (1-500), each label is printed that value times.
Start printing first label on position
Here you can set start position (1-200) from which you want to print first label of the current labels dataset. The order of printed labels is "Top to Bottom" and "Left to Right", as you can see in the following layout.
